In an earlier blog post we looked at the basics of Server-Side Request Forgery (SSRF), the different categories and how to prevent it when developing in-house web applications.
In that article we looked at a series of SSRF payloads and attacks and briefly touched on possible attacks against web applications. In this post we look at a unique method of delivering a SSRF payload and review how this could be leveraged to fully compromise a cloud environment. We will also dive into the potential risks and impact of SSRF and highlight the importance of a secure cloud deployment.
As we have already covered the basics of SSRF in our previous post, so we won’t go into too much detail here. But for a quick refresher, SSRF is a type of injection attack which allows an attacker to supply malicious input to a web application, which is processed by the hosting server as part of the application’s server-side logic which in turn results in a networked request (typically HTTP) being sent from the server to another location. This type of vulnerability occurs when there is a business requirement to communicate with internal or even external content outside the context of the application.
SSRF is one of the OWASP Top 10:2021 Web Application Security Security Risks. Successful exploitation of this flaw allows an attacker to coerce the application into sending any number of crafted requests to an unexpected destination. Since it is the server that is sending the request this can often bypass restrictions intended to prevent access by clients such as firewall, VPN, or other access control list.
There are a few classifications of this attack, of which more details can be found in our original blog post.

Server Name Indication (SNI) is an extension to the Transport Layer Security (TLS) standard defined in RFC 6066 (https://datatracker.ietf.org/doc/rfc6066/), its purpose is to allow clients connecting via the TLS protocol (which is used in HTTPS), to indicate to the connecting server which endpoint they are trying to connect to. The extension allows the client to include the hostname or domain name during the TLS/SSL handshake process in order to ensure that client devices are able to see the correct SSL certificate for the website they are trying to reach. This is particularly useful when connecting to a server that hosts multiple virtual servers at the same network address, as it allows the server to select the virtual server to direct the TLS connection to or select an appropriate TLS certificate to use for the connection before the encrypted channel is established and the Host HTTP request header is received. It has been around since 2003, so it is now widely supported by web browsers and other TLS client software.
The client sends the server name within the ServerName field of the ServerNameList field within the SNI extension of the ClientHello message it sends to the server at the start of the TLS handshake, the server can then read the ServerName and make decisions based on it before returning the ServerHello message which contains the server’s TLS Certificate.
Note that the ServerName field is unencrypted since it is before the generation of the secret session keys which are used for encryption. There is another extension which defines Encrypted SNI (ESNI) which prevents the SNI from being snooped on by an attacker between the client and server, however it was only launched in 2018 with support of Cloudflare and Mozilla and is not yet an official RFC or widely supported.
In order for clients to successfully connect to an SSL/TLS enabled website, a central terminating endpoint is required. Typically, when multiple websites are hosted in the same location, the use of a reverse proxy or load balancer is employed to act as the endpoint. These components act as a gateway and broker determining which internal web server a client’s request should be forwarded to. The proxy or load balancer will receive a TLS handshake which includes the SNI field and uses it to select an appropriate back-end server. The SNI proxy or load balancer can then either operate as a TLS terminator or not. If it is a terminator, then it is responsible for responding with an appropriate TLS certificate to establish the connection with the client, connecting to the back-end server (which may or may not use TLS), and passing the messages between the client and back-end server. If it not the TLS terminator it acts as a TCP proxy and sends the entire TCP stream to the back-end server which is then responsible for TLS termination.
As SNI is now widely supported, it is usually sent automatically by common tools based on the URL requested. It is possible to send an arbitrary sni using curl, by using the –resolve parameter to specify the DNS name resolution, for example in the following command, 203.0.113.12 is IP address of the SNI proxy accepting connections on port 443, and arbitrarysni.example.com is the SNI value that curl will use.
curl -k –resolve arbitrarysni.example.com:443:203.0.113.12 https://arbitrarysni.example.com/
The openssl s_client utility can also be used to establish the connection, however the data to send through the connection must then be manually specified:
openssl s_client -quiet -connect 203.0.113.12:443 -servername “arbitrarysni.example.com”
SNI SSRF is the vulnerability that occurs when an SNI proxy uses the SNI field value without validation to specify the back-end server. This then allows an attacker to send traffic to an arbitrary back-end server which they were not intended to access via the SNI proxy, and typically receive the back-end server’s response.
One effective method of identifying servers vulnerable to SNI SSRF is to use out of band detection.
This requires that you have HTTP(S) server which returns an identifiable response (e.g. “SNI Testing Server 31337”), and a DNS authoritative name server which returns records pointing to the HTTP(S) server. You can then connect to the server under test, specifying a unique DNS name in the SNI field value and monitor inbound DNS requests to your DNS server for the unique DNS name, HTTP requests to your HTTP(S) server, and also observe if you receive the identifiable response from your HTTP(S) server from the request you sent to the SNI proxy. Further details on “blind” SSRF can be found in our original SSRF blog post – https://appcheck-ng.com/server-side-request-forgery-ssrf.
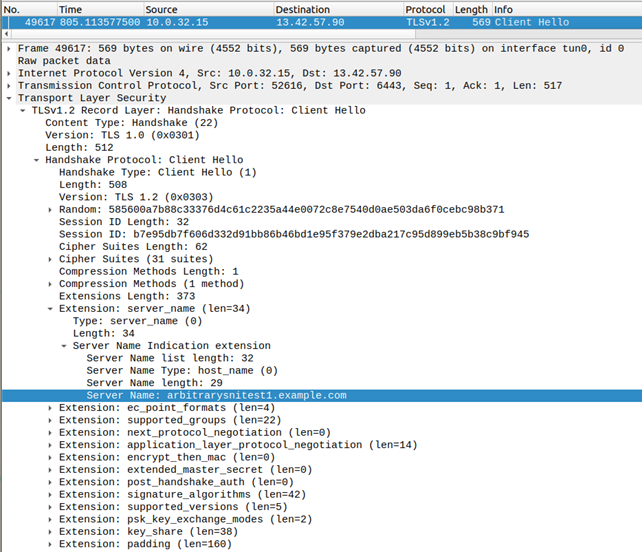
For example, assuming we are the authoritative name server for example.com, and 203.0.113.12 is the server under test, we could use the following curl command to send a HTTP request with “hosttest1.example.com” in the HTTP Host header, and arbitrarysnitest1.example.com in the SNI field:
curl -k –resolve arbitrarysnitest1.example.com:443:203.0.113.12 -H
“Host: hosttest1.example.com”
https://arbitrarysnitest1.example.com/poc_path
We can then review the DNS logs for a query against arbitrarysnitest1.example.com and the lack of a query for hosttest1.example.com. In turn we can review the HTTP logs for a request with host header hosttest1.example.com and path /poc_path, and the curl output for the identifiable content from the HTTP server. (e.g. “SNI Testing Server 31337”).
Note that it is important to ensure that only the SNI value is the unique DNS name, the HTTP Host header must be a different value so that it is possible to differentiate between a vulnerable SNI proxy and other systems that proxy using the HTTP Host header value (which may also be a vulnerability but is not SNI SSRF).
It is also important to specify a URL path and confirm this is received by the HTTP server, since this ascertains that the attacker has control of the path requested which can be used to weed out false positives which can occur when a security system sends a HTTP request to any domain name it observes.
![]()
RFC 6066 states that currently only DNS hostnames are supported in the SNI field value. However, in our testing while we found that some servers will immediately terminate the connection if an IP address is sent, others will accept and process it. Additionally openssl s_client will send an IP address within the SNI field value, however other clients such as those that use the python’s urllib3 will not. Therefore depending on the circumstance it may be possible to simply specify the private IP address within the SNI field to access the service.
A more reliable method is to configure a DNS name under your control to resolve to the private IP address and specify the DNS name within the SNI field.
A limitation of this attack is that the port that the SNI proxy directs traffic to is generally outside of the control of the attacker, therefore it is typically only possible to access a service on the target host which happens to be running on the same port as the legitimate back-end server the SNI proxy is intended to direct traffic to.
In 2013, at DeepSec in Vienna, a security researcher presented “Pivoting In Amazon Clouds” that demonstrated how a feature in Amazon Elastic Compute Cloud (EC2) instances (cloud hosted virtual machines) could be abused. He showed that if an attacker could reach an EC2 instance and communicate with its internal service, then it would be possible to take on the privileges of the EC2 instance to make calls against internal AWS services. Shortly after, it was revealed that in a poorly configured AWS environment (often the default state) that it would be possible to query the AWS internal “instance metadata” service to extract AWS access and secret keys, which could be used to extract more information from the AWS environment and take over an AWS account.
These attacks were used to full affect by an attacker in the United States who stole over 30GB of data containing 106 million consumer applications for credit from Capital One servers hosted on Amazon Web Services (AWS). The data included credit card numbers, social security numbers and bank account details. This compromise was due to a SSRF issue which was identified in Capital One’s Web Application Firewall hosted within the AWS cloud.
Since this attack and our original blog post, SSRF has gained in popularity, reaching 10th place in OWASP’s Top Ten in 2021 and then again in 2022.
In general cloud usage, a metadata service is an API that provides data about a deployed cloud instance or resource that can be used to configure or manage the running instance. Instance metadata is divided into categories, for example, host name, events, and security groups. The exposed metadata service allows easy configuration and access to these categories. The intended use of the service was to grant the ability for EC2 instances to have IAM roles (a generic identity with specific permissions), so that instead of leaving AWS keys for the entire account sitting around on the EC” instance. The instance would instead query its metadata endpoint in order to obtain the necessary credentials to further calls to other AWS services that the EC2 instance was given permission to perform. The service can be used to hold any information that the administrator of the AWS account requires. Typically, the information retained by the metadata service is used to communicate with further AWS services within the estate.
Every deployed EC2 instance has access to their own metadata service, referred to as Instance Metadata Service (IMDS), and can be accessed at the IP address 169.254.169.254 defined by RFC 3927 along with Amazon’s specific implementation. As per the specification this address is dynamically configured to be accessible by the associated instance itself and as such lacks any protection. AWS themselves highlight this on their site:-
“Although you can only access instance metadata and user data from within the instance itself, the data is not protected by authentication or cryptographic methods.”
This isn’t great. Anyone who has access to the terminal of the EC2 server can in turn access and query the metadata endpoint via the loopback interface. However, the same can be said for any software, service or webserver running on the EC2 instance. Any non-blind SSRF vulnerability found on an externally facing web application or server hosted on an EC2 server can be used to query the same metadata service and used to extract useful and potentially damaging information. Depending on the services that the EC2 is required to communicate with, the level of sensitive information retained by the metadata service can vary greatly. For instance, on EC2 instance that have an IAM role attached to them, the metadata service will also contain the associated AWS access tokens and secret keys which are used to authenticate to the AWS management console.
In 2019 AWS released IMDSv2 which had a number of changes to increase the security of IMDS and specifically to try and protect the service from being accessed via open Web Application Firewalls (WAF), open reverse proxies, and SSRF vulnerabilities (https://aws.amazon.com/blogs/security/defense-in-depth-open-firewalls-reverse-proxies-ssrf-vulnerabilities-ec2-instance-metadata-service/). These changes include the requirement to send a PUT request to /latest/api/token with a X-aws-ec2-metadata-token-ttl-seconds request header in order to obtain a short lived token to access other metadata routes. These changes were greatly affective at mitigating SSRF attacks.
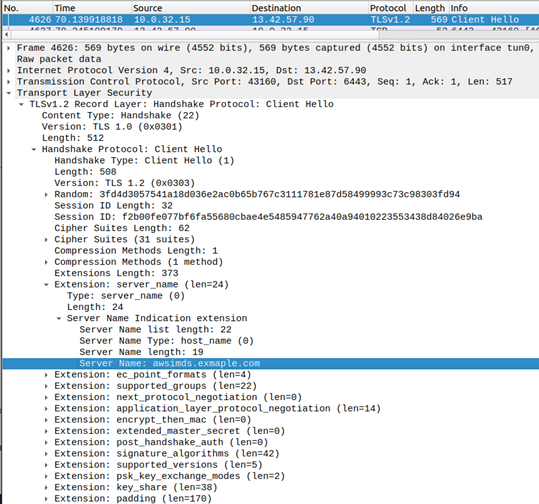
If a vulnerable SNI proxy is running on an EC2 instance and is configured to terminate TLS and proxy the traffic to port 80 of the server specified in the SNI field value, it is possible to exploit SNI SSRF to access the AWS IDMSv1 metadata service. This requires a DNS record that resolves to 169.254.169.254 which in this example is awsimds.example.com.
curl -k –resolve awsimds.exmaple.com:443:203.0.113.12
https://awsimds.example.com/latest/meta-data/
However in the case of a vulnerable SNI proxy, the attacker has a lot of control of the HTTP request so it is possible to form a valid request to obtain a token:
curl -k –resolve awsimds.exmaple.com:443:203.0.113.12 -X PUT -H “X-aws-ec2-metadata-token-ttl-seconds:
1” https://awsimds.example.com/latest/api/token/
Note that one of the other defences employed by AWS is to reject requests which have the X-Forwarded-For HTTP header, therefore if the SNI proxy is configured to add this header to requests it cannot be exploited to access the IMDSv2.
Furthermore the TTL of the IP packet of the response is set to 1 which usually prevents open layer3 firewalls and NAT from transmitting the response beyond the instance, and even prevents docker containers running on the instance from interacting with the IMDSv2 service. However if the vulnerable SNI proxy is running on the EC2 instance itself rather than in a container, it receives the response and passes it onto the attacker.
![]()
As we have shown even protection mechanisms specifically designed to protect against SSRF are not always effective and result in a bypass. As always, a defence in depth approach is needed to fully guard a network from any attack.
As a rule of thumb, when developing a web application, it is important to ensure that you avoid using user-provided input directly in functions that can make requests on behalf of the server. Depending on the application, it may not be possible to completely remove the possibility of SSRF vulnerabilities while still retaining the application’s desired functionality of making calls to user-provided URLs.
However, it is certainly possible to mitigate the risks of SSRF and to minimize the potential for damage from an attacker. The rules below provide general guidance in this area:
The most effective measure if you must process user-provided input that is later used in an outbound call to a URL is to validate the input and restrict the range of permitted inputs to the minimum possible to deliver your web application’s functionality. For example we’ve seen that some attacks rely on the use of protocols and scheme such as file: and ftp: – if your application is only ever intended to call URLs, then ensure that you use a URL-specific parser rather than a more generic URI-parser that permits these alternative types (such as file:, dict: ftp:, and gopher:), and ensure that you test which protocols it permits. If you disable unused URI schemas, the attacker will be unable to use the web application to make requests using potentially dangerous schemas.
You can extend this functionality by further analysing the URL received and ensuring that, for example, it relates to a permitted domain. Where possible compare the target domain to a whitelist of permitted FQDNs (“DNS names”) or IP addresses that your application may reasonably be expected to need to access.
It can be tempting to try and implement the above functionality using regular expressions or regex in your code. However, regexes relating to permitted URL schemas can soon become obscure, difficult and complex. It is almost always worthwhile using standard existing libraries for URL validation in your language.
Ensure that you write unit test specifically testing the behaviour of your code – both “positive” tests ensuring that functionality operates correctly for permitted URLs but also “negative” tests ensuring that calls to non-permitted resources of various types fail. This protects against future code regression in later updates.
You can add some additional preventative protections in the form of a tuned web application firewall or intrusion prevention system that specifically include protections against SSRF attacks. Most WAFs will include functionality for SSRF protection as standard. Care should be taken that these are tested thoroughly before enabling to ensure that false positives to not break application behaviour, and it should not be believed that operating a WAF will ensure your application is completely screened – it is one measure only in a “defence in depth” strategy.
“Least privilege” is the concept of ensuring that all users, components and systems within your application and network are configured with the minimal set of network access, system access, code execution and data access privileges that are necessary for them to fulfil their functional requirements.
This ensures that even if an SSRF vulnerability is discovered, an attacker will be less likely to be able to exploit it since the code will not be able to access targeted resources, leaving the vulnerability toothless.
This is particularly important in cloud environments where the impact of instances with excessive role permissions can be severe.
It is a general best practice, not only relating to SSRF, to review firewall configurations to ensure that they specifically apply the principle of least privilege, outlined above, to connectivity for both inbound and outbound traffic from your servers. You should define what is required in terms of access to deliver functional behaviour, and then add a rule to explicitly allow this, on top of a baseline “default deny” rule.
Linked to this general rule, you should additionally specifically restrict access to the any service making use of user-included input in constructing URLs itself to the smallest attack surface, meaning that if the service is only meant to be used internally, ensure it is only accessible internally using IP service binding and firewall configuration.
It is good practice to verify the response from a URL call and ensure that it is within expected bounds, within your code.
Ensuring that the code validates the response from the URL and errors or fails to return the payload if it is outside the bounds (or is otherwise unexpected in anyway), helps to prevent response data leaking to the attacker if a URL call is compromised via SSRF.
By default, services such as Memcached, Redis, Elasticsearch, and MongoDB do not require authentication, therefore an attacker can use SSRF vulnerabilities to access some of these services. To ensure that this cannot occur, it is best practice to enable authentication wherever possible, even for services that are only exposed on the local network (or even just bound to the localhost interface and not exposed on the network at all).
Finally, consider logging the requesting IP address of the user submitting the URL payload in your web access logs as well as including it in the onward URL request as an X-Forwarded-For HTTP request header. The target server may not necessarily be doing anything with this new information, however retaining this trace can be helpful in both forensics (investigating an incident once detected) as well as spotting unusual patterns via log analysis (e.g. high volumes of requests to the URL calling function from a specific IP address.)
Written by Oliver Morton, Offensive Security, Research and Development at AppCheck Ltd.
AppCheck performs comprehensive checks for a massive range of web application vulnerabilities from first principle to detect vulnerability – including SSRF. AppCheck also draws on checks for known vulnerabilities in vendor software from a large database of known and published CVEs. The AppCheck Vulnerability Analysis Engine provides detailed rationale behind each finding including a custom narrative to explain the detection methodology, verbose technical detail and proof of concept evidence through safe exploitation.
As always, if you require any more information on this topic or want to see what unexpected vulnerabilities AppCheck can pick up in your website and applications then please get in contact with us: info@localhost